Writing a Bootloader from Scratch in FASM
Although OSDev and many other sites recommend first starting with GRUB, I wanted to write my own as a learning experience and see how far I can get with it before I needed to switch to GRUB. Anyone who has written a bootloader before knows that they are typically written in 16-bit assembly and must fit into a 512 byte package.
The bootloader is loaded into 0x7C00 and so I'll need to write code to offset the assembly code by that address. I also made the decision to load the kernel into address 0x1000, but this will likely change in the future. The last step is to buffer out the bootloader to 512 bytes and make the last 2 bytes 0xAA55. The FASM equivalent code for this is below:
; Instruct FASM to use 16-bit
use16

; Set global memory offset
org 0x7c00

; Memory offset where we'll load the kernel
KERNEL_OFFSET equ 0x1000

; Buffer bootsector out to 512 bytes
times 510-($-$$) db 0
dw 0xaa55
Adding in Print Functions
Writing functions such as the print function is fairly straight forward. My implementation takes the address of the string in register SI and simply loops until it hits the null character 0. I've also wrote a print function that prints out both words and bytes as hexadecimal.
; Put the address of the string in si prior to calling. Terminated by 0x00
print_string:
    pusha
    mov ah, 0x0E
    .p_loop:
        lodsb
        cmp al, 0x00
        je .done
        int 10h
        jmp .p_loop
    .done:
        popa
        ret

; Assume the byte is in bx prior to calling
print_hex_word:
    push ax
    mov al, bh
    call print_hex_byte
    mov al, bl
    call print_hex_byte
    pop ax
    ret

; Assume the byte is already in al
print_hex_byte:
    pusha
    ; Get the higher 4 bits
    mov dl, al
    shr al, $4
    call print_hex
    ; Get the lower 4 bits
    mov al, dl
    mov cl, 0x0F
    and al, cl
    call print_hex
    popa
    ret

; Assume the byte is already in al
print_hex:
    pusha
    mov ah, 0x0E
    add al, 0x30
    cmp al, 0x39
    jbe .done
    add al, 0x07
    .done:
        int 10h
        popa
        ret
Putting this all into a file called printfuncs.asm made it easy to include in main boot script. Again, calling our functions is as simple as moving our string address into register SI.
; Print name of Bootloader
mov si, startup_message
call print_string

; Print out stack location
mov bx, bp
call print_hex_word

; Loop forever here.
jmp $

; String Labels
startup_message:
    db 'KoiZ OS. Stack Start: ', 0x00
Compiling the bootloader
The following code will compile the FASM code into a straight binary file we can write to a disk, or run directly in QEMU.
fasm.x64 bootsect.asm ../bin/bootsect.bin
Running it in QEMU is as simple as the following command:
qemu-system-x86_64 -fda bin/bootsect.bin

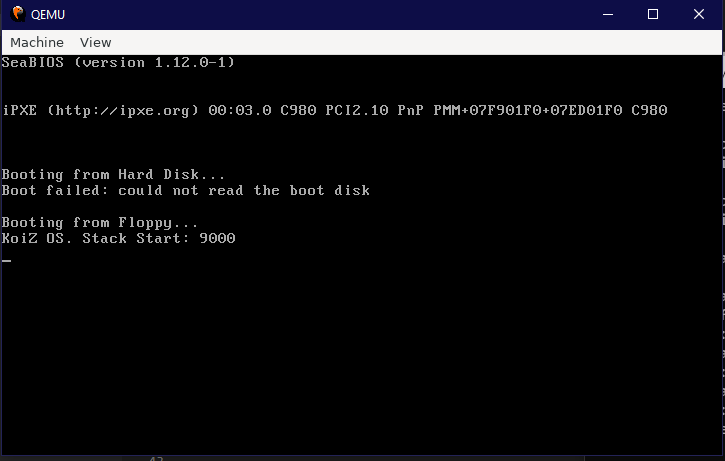
As expected, it printed out the stack address and than hung on the infinite JMP instruction.
Moving into 32-bit Protected Mode
Right now, everything is running in 16 bit. To take advantage of the 32-bit registers and memory, I'll need to switch the processor to 32-bit protected mode. To do this, I simply load the global descriptor table and set the control register to go into protected mode. Again, for FASM, this looks like this.
use16
use_32bpm:
    ; Disable interrups
    cli

    ; Load our descriptor
    lgdt [gdt_descriptor]

    ; Set the first bit of cr0 to goto protected mode.
    mov eax , cr0
    or eax , 0x1
    mov cr0 , eax

    ; Execute farjump to the 32 bit code
    ; This apparently flushes the cpu pipeline of pre-fetched 16bit instructions
    jmp CODE_SEG:init_32bpm

use32
init_32bpm:
    ; Remember that our old segments are useless now
    mov ax, DATA_SEG

    ; Point segment registers to what we defined in the GDT
    mov ds, ax
    mov ss, ax
    mov es, ax
    mov fs, ax
    mov gs, ax

    ; Update stack position so its on top of free space
    mov ebp, 0x90000
    mov esp, ebp

    call main_32b
The GDT definition I'm using is here. I documented it as best as I could, but a more in depth tutorial exists over at the OSDev Wiki.
; GDT
; Alright, time for some fun
gdt_start:

; This is required
; 32 bits
gdt_null:
    dd 0x0
    dd 0x0

; Code segment descriptor
; base = 0x0
; max  = 0xFFFFF
gdt_code:
    ; Limit (bits 0-15)
    dw 0xFFFF
    ; Base (bits 0-15)
    dw 0x0
    ; Base (bits 16-23)
    db 0x0
    ; Access Byte
    ; Present           = 1b. Set to 1 for valid selectors.
    ; Priviledge        = 00b. Ring 0 thru 3.
    ; Descriptor Type   = 1b. Should be set for code/data segments and cleared for system segments
    ; Executable bit    = 1b. Is 1 if code in the segment can be executed
    ; Direction bit     = 0b. Code in this segment can be executed from an equal or lower privledge
    ; RW bit            = 1b. Whether read access is allowed for code or write access is allowed for data.
    ; Accessed bit      = 0b. CPU sets to one when the segment is accessed.
    db 10011010b
    ; Flags and limit
    ; Granularity bit   = 1b. 0 means byte granul, 1 means limit is 4 KiB blocks (page granul)
    ; Size bit          = 1b. 0 means 16bit protected mode, 1 means 32 bit protected mode.
    ; Empty bits        = 00b. Padding
    ; Limit bits        = 1111b.
    db 11001111b
    ; Base
    db 0x0

gdt_data:
    ; Limit (bits 0-15)
    dw 0xFFFF
    ; Base (bits 0-15)
    dw 0x0
    ; Base (bits 16-23)
    db 0x0
    ; Access Byte
    ; Present           = 1b. Set to 1 for valid selectors.
    ; Priviledge        = 00b. Ring 0 thru 3.
    ; Descriptor Type   = 1b. Should be set for code/data segments and cleared for system segments
    ; Executable bit    = 0b. Is 1 if code in the segment can be executed
    ; Direction bit     = 0b. Code in this segment can be executed from an equal or lower privledge
    ; RW bit            = 1b. Whether read access is allowed for code or write access is allowed for data.
    ; Accessed bit      = 0b. CPU sets to one when the segment is accessed.
    db 10010010b
    ; Flags and limit
    ; Granularity bit   = 1b. 0 means byte granul, 1 means limit is 4 KiB blocks (page granul)
    ; Size bit          = 1b. 0 means 16bit protected mode, 1 means 32 bit protected mode.
    ; Empty bits        = 00b. Padding
    ; Limit bits        = 1111b.
    db 11001111b
    ; Base
    db 0x0

; Label at the end helps the assembler calculate the size of the GDT for the GDT descriptor
gdt_end:

; Our descriptor contains
; - the size of our GDT (1 less than actual size)
; - start address of GDT
gdt_descriptor:
    dw gdt_end - gdt_start - 1
    dd gdt_start

; Constants to help us later if needed
CODE_SEG equ gdt_code - gdt_start
DATA_SEG equ gdt_data - gdt_start
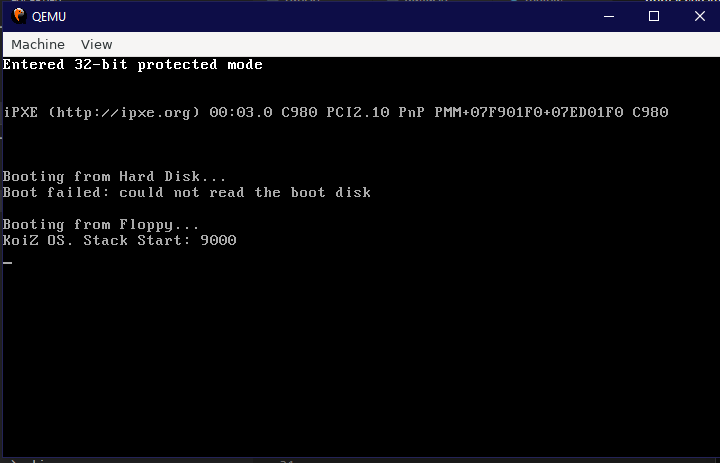
The main_32b function isn't listed, but it simply prints a string that says "Entered 32-bit protected mode" to console. Running

Writing the First Koiz OS Kernel
I wrote a diskload function to load the kernel at the KERNEL_OFFSET constant and a main function that's called by the function above.
load_kernel:
    ; Load 15 sectors from 0x0000(ES):KERNEL_OFFSET(BX)
    mov bx, KERNEL_OFFSET
    mov dh, 15
    mov dl, [boot_drive]
    call disk_load
use32
main_32b:
    ; Alright, enter into our kernel!
    call KERNEL_OFFSET

    jmp $
The kernel itself is written in C and doesn't do much but place an X in screen. Note that 0xB8000 is the video memory in protected mode so by writing in there, we can write characters directly to the screen. More information about that is available over at OSDev.
void main () {
    char * video_memory = ( char *) 0xb8000 ;
    *video_memory = 'X';
}
The last thing to do is write a quick kernel entry function which is placed at the beginning of the to call our main() function from C.
format ELF
use32

section '.text' executable
    extrn main
    call main

    jmp $
Putting it All Together
The most important thing for us to worry about at this point is making sure that kernel_entry shows up first!
# Make sure these folders exist
mkdir -p ../bin
mkdir -p ../obj

echo "compiling 32-bit kernel entry code"
# Build our custom kernel entry executable
fasm.x64 kernel_entry.asm ../obj/kernel_entry.o

echo "compiling 32-bit kernel"
# Compile the kernel
gcc -m32 -ffreestanding -c main.c -o ../obj/main.o -fno-pie

echo "linking 32-bit kernel"
# Link everything together
ld -o ../bin/kernel.bin -Ttext 0x1000 ../obj/kernel_entry.o ../obj/main.o --oformat binary -m elf_i386
Adding the kernel image to the bootloader is as simple as combining them with the cat command.
cat bin/bootsect.bin bin/kernel.bin > bin/koizos-img.bin
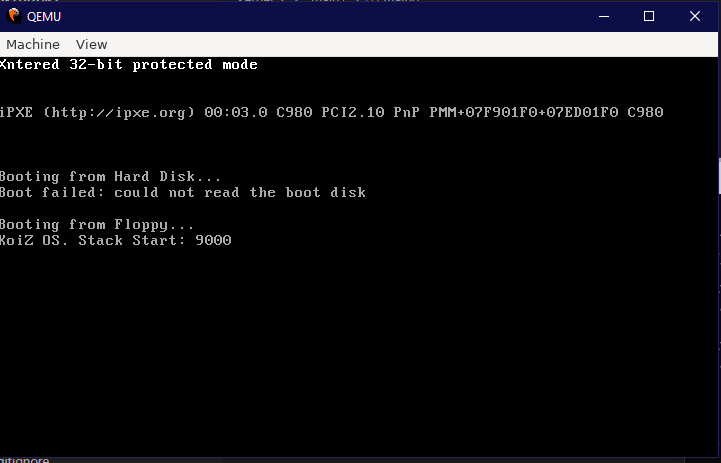
After running our new image in QEMU, one can see that the kernel loaded and replaced the E with an X!

Conclusion
The full code up to this point is available here: https://github.com/drakeor/koiz-os/tree/9bc105183c74e814e4feb1a988c8cd771479b111
As we don't have a standard library or any functions like that in general, the next steps are to develop our own standard C library for use with our OS!

