

Introduction
We're starting out the new year with a tutorial as I haven't wrote anything in my blog for a while. I wrote this at first for my reference for setting up my servers since the existing tutorials I found were either a bit spotty or outdated. This tutorial is tested mostly for the AMD/NVIDIA combination since that's what I run on most of my machines.
Background
I run quite a few virtual machines including Linux and Windows VMs on my servers for various projects. Lately, one of the projects largely benefits from the presence of a GPU (for hardware acceleration of image manipulation) so I installed a low-powered one in my server. For this tutorial, I will be setting up a Windows Guest on a Debian Linux Host machine and using GPU Passthrough.
Software I'm Using
- Debian 11 with libvirt and virsh installed (Host Machine)
- Windows Server 2019 (Guest Machine)
Hardware I'm Using
- ASRock Rack X470D4U
- AMD Ryzen 5800G
- NVIDIA Quadro T400
Checking for IOMMU Support on your Motherboard
This tutorial assumes that you have IOMMU support for both your motherboard and CPU. Most modern server motherboards should support it, but your mileage may vary with desktop motherboards. Here are the options in BIOS corresponding to IOMMU related features:
- Intel Based: Enable "Intel VT-d". May also be called "Intel Virtualization Technology" or simply "VT-d" on some motherboards.
- AMD Based: Enable "SVM". May also be called "AMD Virtualization" or simply "AMD-V".
- Note: I've seen "IOMMU" as it's own separate option on one of my motherboards, but not on any of my other motherboards. Make sure it's enabled if you do see it. If you don't see it, it's likely rolled into one of the former VT-d or AMD-V options listed above.
Checking for IOMMU Support on your CPU
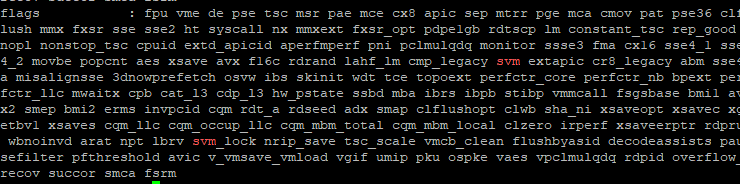
On Debian for my AMD processor, it's as easy as this:
cat /proc/cpuinfo | grep --color svm
You can see it highlighted below:
The Intel equivalent is this:
cat /proc/cpuinfo | grep --color vmx
Enabling IOMMU in Linux
NOTE: Before you do the following, it's helpful to go back in your BIOS and make sure that the Primary GPU is set to integrated and not using your passthrough graphics card. This is called "Boot GPU" and "Primary Graphics" in my BIOS.
Add the following options to your GRUB_CMDLINE_LINUX option in the /etc/default/grub file
AMD:
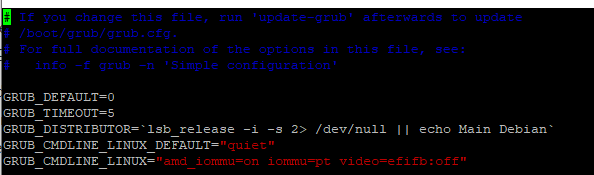
amd_iommu=on iommu=pt video=efifb:off
For me, it will look like this. If there's options in there already, leave them alone.
Intel:
intel_iommu=on iommu=pt video=efifb:off
And then update GRUB:
sudo grub-mkconfig -o /boot/grub/grub.cfg
Make sure to reboot your system.
Then, to check that IOMMU is enabled, we can run the following command
sudo dmesg | grep -i -e DMAR -e IOMMU
You should see at least a message or two about it loading like below:

Finding IOMMU Groups
Before looking at the IOMMU Groups, I want to make sure that my graphics card is visible to the OS. I run the following command:
lspci -nnk | grep VGA
For me, this results in 3 graphics controllers being shown: The ASPEED one that's part of my motherboard, the NVIDIA one that's my T400 graphics card, and the AMD one which is the Vega graphics that's part of my CPU. Of course, you'll likely see different.

To list all the IOMMU groups they are part of, we'll use the following script that someone else wrote:
#!/bin/bash
shopt -s nullglob
for g in /sys/kernel/iommu_groups/*; do
    echo "IOMMU Group ${g##*/}:"
    for d in $g/devices/*; do
        echo -e "\t$(lspci -nns ${d##*/})"
    done;
done;
Take note of the IOMMU Group your graphics card is in. Note that mine is in IOMMU Group 7:

The Vega graphics that are integrated with my CPU are in IOMMU Group 4:

Side Note: Using Passthrough for Integrated Graphics
So above I mentioned that since I have a Ryzen 7 5800G, my CPU comes with a GPU chip attached called Vega Graphics. I spent a bit of time seeing if I could use this as a passthrough GPU as well.
Long story short, I got somewhere but it was ugly. I do not recommend it.
First, note that the IOMMU Group it's in is shared with a lot of other devices and we need to pass all devices in the group at once. This broke for me when I tried, which I expected. There are some kernel patches out there for Debian including ACS related ones that I went ahead and used for curiosity sake that can get around this. Using ACS Override actually did seem to work, and I could pass it, but I was having trouble getting my guest to see it.
ACS Override isn't a stable or secure way to do this, at least not when I last touched this section of the Linux kernel years ago. I was talking to my friend about this and we were both trying to think of what's preventing us from totally messing up the memory and writing where weren't supposed to. Perhaps I'll dive into this a bit later when I have time and run some tests on this, but for, I'd say it's best to avoid trying to do this.
Loading the Correct Kernel Modules
Okay, so now that we have IOMMU all set, we need to make sure to load the correct modules for our passthrough graphics card. By default, nouveau will try to grab the graphics card when we boot.
I created a new file called /etc/modprobe.d/vfio.conf and added the following lines:
blacklist snd_hda_intel
blacklist nouveau
options vfio_pci ids=10de:1fb2,10de:10fa
Note that I got the IDs from the IOMMU Group above. I need to pass in EVERY device in that IOMMU group or it won't work! Even though I'm not using audio, I still need to pass in the audio device in that group.

Also note that I'm opting to blacklist the nouveau and snd_hda_intel since I don't use them in my host anyways and they were loading besides vfio_pci.
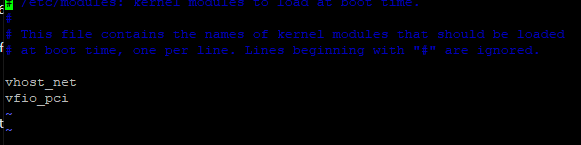
In /etc/modules-load.d/modules.conf, we'll ensure vfio_pci is loaded at boot:
vfio_pci
Reboot the system.
Now run the following to make sure the correct module is being used:
lspci -nnk

Perfect! We're now ready to pass this GPU to the guest VM.
Passing the GPU to the Guest VM
So recall that the PCI address is on the left-side of when I ran lspci -Dnn earlier:

We want to take that value (0000:10:00.0) and convert all the colons and dots into underscores. So for 0000:10:00.0, it will be 0000_10_00_0
Now we need to detach the PCI device from the host machine. We can do this with the following virsh command:
virsh nodedev-detach pci_0000_10_00_0
Then we'll edit the VM we want to attach the GPU to with the following virsh command:
virsh edit windows-vm
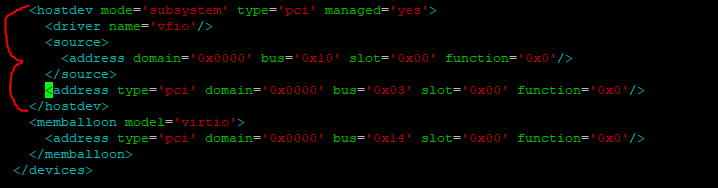
Under the devices tag, we'll add the GPU. Note that address, bus, slot, and function matches the PCI address we saw earlier but it's just broken out in this case! Also note the VFIO driver.
..
<devices>
...
    <hostdev mode='subsystem' type='pci' managed='yes'>
        <driver name='vfio'/>
        <source>
        <address domain='0x0000' bus='0x10' slot='0x00' function='0x0'/>
        </source>
    </hostdev>
...
</devices>
...
Reboot the VM in virsh
Testing the GPU Passthrough in the Guest
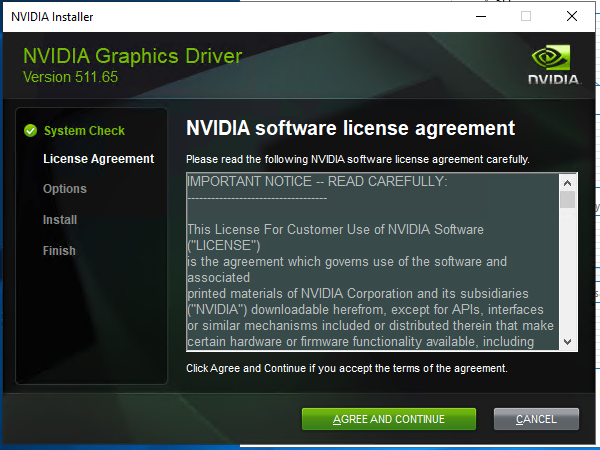
To test the GPU, I'll download the NVIDIA Drivers from their website and try to install it onto the guest.
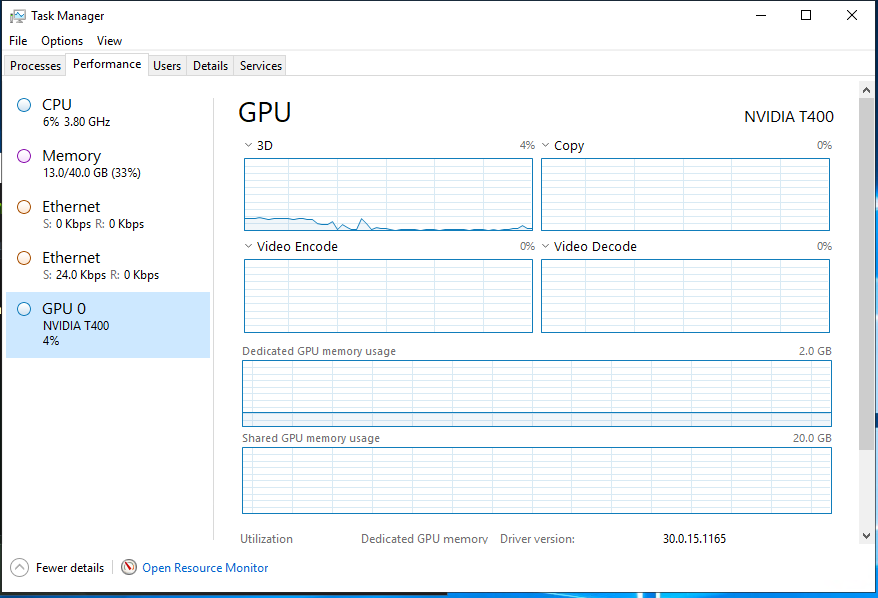
It looks like it installed alright and we can now see the GPU in the task manager.
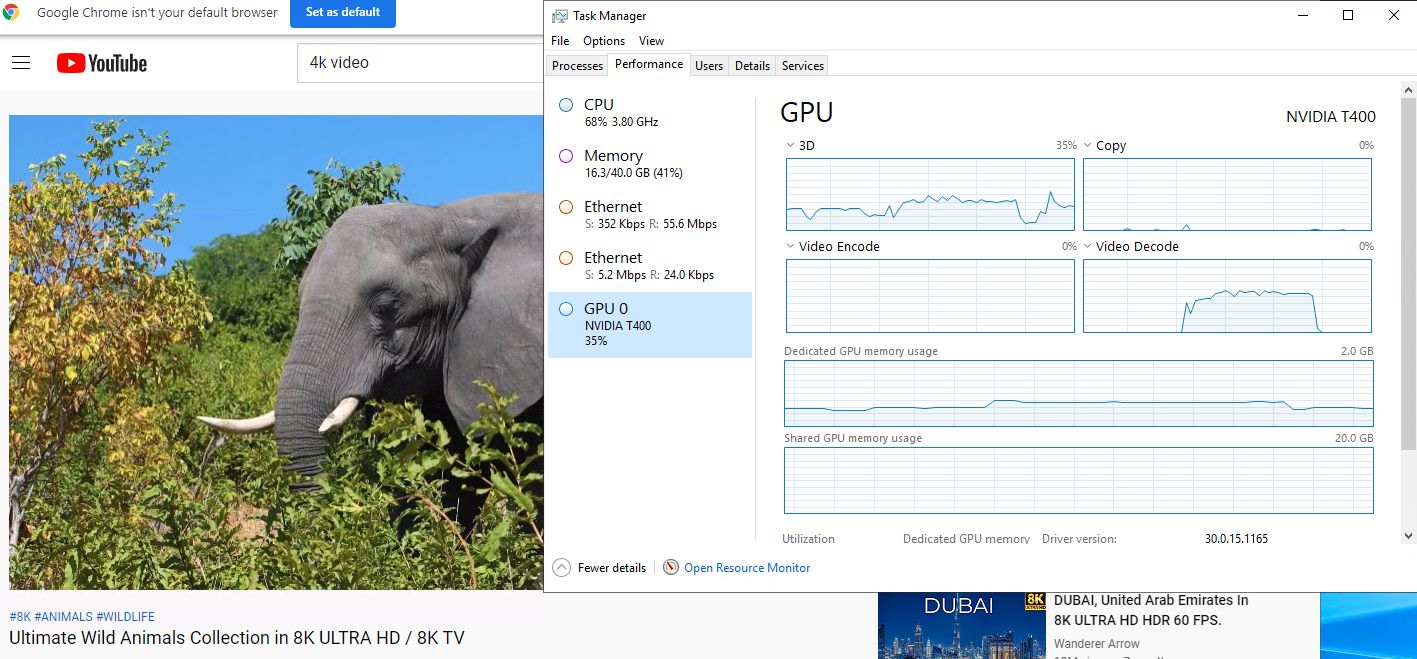
Opening up Chrome and playing a random 8k YouTube video shows that Chrome is indeed being hardware accelerated.
Conclusion
Hopefully this helps someone whose interested in setting up GPU Passthrough in Linux. I do want to dive more into that ACS Override stuff as it's interesting to me, so perhaps I will make a post about that later.